In this Swift 2 tutorial you'll see how to use an UICollectionView as an image gallery. You'll see how to download the images in an asynchronous way, how to properly cache them for the current session, to avoid to download them again while scrolling the UICollectionView, and finally how to display them inside the custom Cell.

Project initialization
Let's create a new iOS Swift single view application. For this tutorial we'll use the http protocol, for this reason we need to allow it inside the info.plist swift file. Let's right click on it, choose open as, choose source code and inside it add the NSAppTransportSecuity key and enable the NSAllowsArbitraryLoads. This will allow your iOS App to use the http protocol.
<key>NSAppTransportSecurity</key>

<dict>

	<key>NSAllowsArbitraryLoads</key>

	<true/>

</dict>
Layout definition
Open now the main.storyboard. We'll add inside the UIViewController an UICollectionView and then we'll customize the cell inside it. Under the file inspector we can disable the use size classes feature, we don't need that.
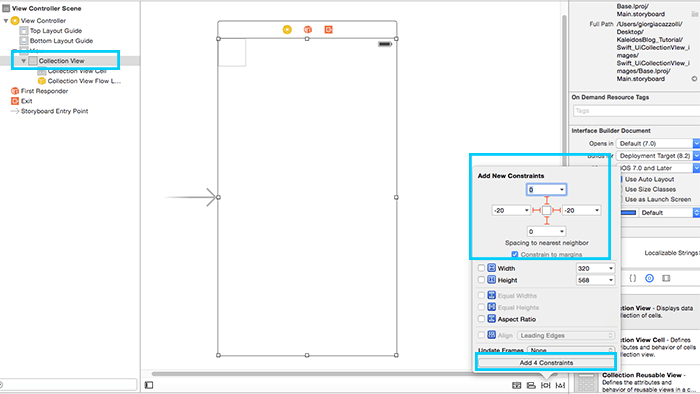
Add inside the UIViewController the CollectionView, set the size to fit the screen size, and add the following constraints for the top, left, right and bottom.

Select now the cell of the UICollectionView, under the size inspector change size to Custom and add a width and height of 120. This parameter is not used by swift when is rendering the cell on the iOS App, but allows us just to define better the custom cell.
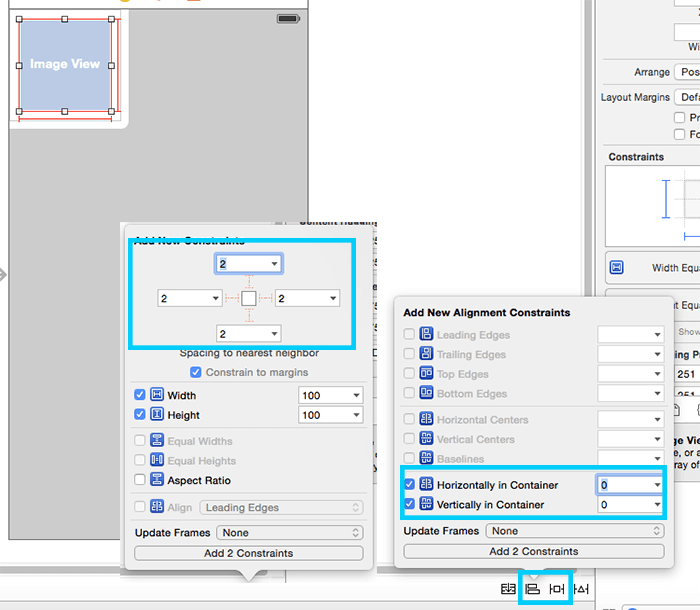
Choose the UIImageView component and put it inside the UiCollectionViewCell. Align it and resize it inside the cell as you want and at the constraints. Here are the contraints I've used:

Create the Custom cell Class
In order to have a custom cell, we need also a custom class. Let's create it.
Choose File - New - File
Select iOS - Cocoa Touch Class
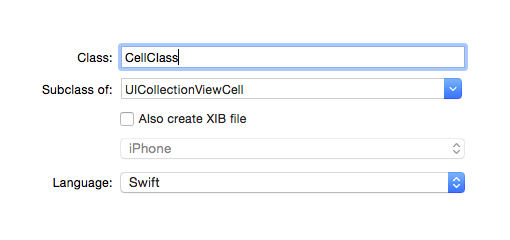
For subclass choose UICollectionViewCell
And for class choose the name you want, we will use in this case CellClass
Press next and create

Turn now back to the main.storyboard and select the UICollectionView Cell.
Under the identity inspector write the class name you've previously created (CellClass in my case) and under the attribute inspector write "cell" as an identifier (or write the name you want).

Link with the assistant editor the image view to the custom class
Now it's time to link the UIImageView to the custom class (CellClass). Select the UIImageView, open the Assistant Editor (it's on the right top, the two circles), hold CTRL key button and drag and drop the UIImage inside the Cell Class.

Select now the UICollectionView and using the Assistant Editor link it to the ViewController class. As a variable name I wrote collectionview, but be free to put the name you want.
Download the images and display them inside the cells
It's now time to download the images and to display them inside the cells. Open the ViewController.swift class.
Define now the required data structures.
The images cache array allows to keep for the current session (for all the time the app is opened) the downloaded images in a cache, this allows to avoid to download them again while scrolling. In fact every time the user scrolls the CollectionView, the cells are reused. Reusing a cell is something like destroying the previous content and display the new one. So we'll keep for this reason the content stored.
The image array allows us to keep the json data structure that defines the links of the images.
The link String defines the link of the json of the images. In this example I've prepared for you a simple array of images.
You can find it here.
var images_cache = [String:UIImage]()
var images = [String]()
let link = "https://www.kaleidosblog.com/tutorial/get_images.php"
For getting the links of the images, we'll use the json format. Let's define the functions for downloading and parsing the data.
The get_json is used to download from the link the json array of images, the extract_json_data perform the data extraction from the json string, and load image is a function that requires as an input the link of the image and the UIImageView of the cell. In this ImageView the image will be displayed as soon as is arrived.
    func load_image(link:String, imageview:UIImageView)
    {

        let url:NSURL = NSURL(string: link)!
        let session = NSURLSession.sharedSession()

        let request = NSMutableURLRequest(URL: url)
        request.timeoutInterval = 10


        let task = session.dataTaskWithRequest(request) {
            (
            let data, let response, let error) in

            guard let _:NSData = data, let _:NSURLResponse = response  where error == nil else {

                return
            }


            var image = UIImage(data: data!)

            if (image != nil)
            {


                func set_image()
                {
                    self.images_cache[link] = image
                    imageview.image = image
                }


                dispatch_async(dispatch_get_main_queue(), set_image)

            }

        }

        task.resume()

    }


    func extract_json_data(data:NSString)
    {
        let jsonData:NSData = data.dataUsingEncoding(NSASCIIStringEncoding)!
        let json: AnyObject?

        do
        {
            json = try NSJSONSerialization.JSONObjectWithData(jsonData, options: [])
        }
        catch
        {
            print("error")
            return
        }

        guard let images_array = json! as? NSArray else
        {
            print("error")
            return
        }

        for var j = 0; j < images_array.count ; ++j
        {
            images.append(images_array[j] as! String)
        }

        dispatch_async(dispatch_get_main_queue(), refresh)
    }


    func refresh()
    {
        self.collectionview.reloadData()
    }


    func get_json()
    {

        let url:NSURL = NSURL(string: link)!
        let session = NSURLSession.sharedSession()

        let request = NSMutableURLRequest(URL: url)
        request.timeoutInterval = 10


        let task = session.dataTaskWithRequest(request) {
            (
            let data, let response, let error) in

            guard let _:NSData = data, let _:NSURLResponse = response  where error == nil else {

                return
            }

            let dataString = NSString(data: data!, encoding: NSUTF8StringEncoding)

            self.extract_json_data(dataString!)

        }

        task.resume()

    }
Finally let's initialize the cell's width and height, the UICollectionView data source class and delegate. Remember to implement for the ViewController class the UICollectionViewDataSource, UICollectionViewDelegate methods (just write them above the ViewController class name definition, like ViewController: UIViewController, UICollectionViewDataSource, UICollectionViewDelegate)
The numberOfItemsInSection method uses the images array to let Swift know how many cells are to display.
cellForItemAtIndexPath function defines the content of a single cell defined by indexPath row (the number of the cell).
Remeber to put as a dequeueReusableCellWithReuseIdentifier the reusable identifier that you wrote under the attribute inspector.
    override func viewDidLoad() {
        super.viewDidLoad()


        let layout:UICollectionViewFlowLayout = UICollectionViewFlowLayout()

        layout.itemSize = CGSizeMake(120,120)


        self.collectionview.setCollectionViewLayout(layout, animated: true)

        get_json()

        collectionview.delegate = self
        collectionview.dataSource = self
    }


    internal func collectionView(collectionView: UICollectionView, numberOfItemsInSection section: Int) -> Int
    {
        return images.count
    }


    internal func collectionView(collectionView: UICollectionView, cellForItemAtIndexPath indexPath: NSIndexPath) -> UICollectionViewCell
    {
        let cell:CellClass = collectionView.dequeueReusableCellWithReuseIdentifier("cell", forIndexPath: indexPath) as! CellClass

        if (images_cache[images[indexPath.row]] != nil)
        {
            cell.Image.image = images_cache[images[indexPath.row]]
        }
        else
        {
            load_image(images[indexPath.row], imageview:cell.Image)
        }

        return cell
    }


    internal func numberOfSectionsInCollectionView(collectionView: UICollectionView) -> Int
    {
        return 1
    }
Complete project example download
Here you can download the final project
Here you can download the project for Swift 3


Leave a comment